A 'Transition' is the movement or change of each of the individual scenes and shots within the music video. One example of a transition is the 'Fade' transition. These were numerously used throughout the video. Please see the list below that shows when a 'Fade' transition was selected to occur in the music video:
- In the beginning of the music video in the argument scene between the boyfriend and girlfriend.
- The scene where chloe is looking on at the boys abandoning her and moving towards the girls
- When the group of teenagers walk out of shot and the cross over from the park to the living room.
The next transition I used was that I cut the scene where the tramp was leaving his position on the street and walked out of shot. I cut this scene into little segments and with each segment I cropped to make the left side of the tramp turn black and in a sense 'walk with him' as he leaves his 'area'. The wipe is called a 'Bar Wipe' which moves from left to right. An example can be seen below:

The next transition I used was the 'Dissolve' transition which was selected to distort the movement of the four characters leaving the bench walking past the camera. The interesting thing about this shot was that any transition we used on the shot, the footage would automatically change each time into distorting the overall footage. This worked in our favour as it produced various effects that even we couldn't apply. The colours that were created are vibrant which adds to the feeling of being drunk which the teenagers were feeling. Below you can view the tool that we used which was present in the effects area in Adobe Premiere Pro.
Another tool we used was the razor tool (not in the 'Effects' tab) whiched allowed us to slice up any piece of footage. This helped us cut each shots to apply the effects to them or just simply remove any unwanted shots such as bloopers etc.
This cutting technique was used throughout the music video and can sometimes be seen as very noticeable such as when the boyfriend is walking to the tramp he is moving backwards and forwards in time with the music. Quick cuts were also used to represent the anger and momentum of the argument.
An example of this technique being implemented is the scene of the beggar lying on the street. The music present here is very loud and bass heavy. We decided to place the tramp in this scene as we feel it represents the tramps messy and distorted life which the music mirrors.
The simple razor tool was also used to cut shots to be placed exactly in time with the beat of the music. This can be found when the teenagers are walking away from the tramp and coming towards the camera. The camera focuses on their legs and feet. Each of their steps are in time with the drums of the soundstrack. Another good example of a great cut and in time with the music, is when the lyrics say, "No, its the saddest experience you'll ever know". The camera immediately cuts to Chloe's angry yet and bewildered face, just as the singer says, "No". We feel this shot is excellently executed as it was just spontanious that she was to say that and we are lucky we found that footage and we thought on our feet as we feel it definitly made the music video much more powerful to the audience.
Effects:
An 'Effect' is a alteration to an original clip to distort the image in some way. Examples of some effects are the change in contrast, brightness, saturation, focus and blur. Effects are useful when it comes to editing a music video, as the user can alter or change footage which they could not do when filming for example, the majority of the the music video is displayed in black and white however, when we captured the footage, we did not film in black and white however we used the black and white tool available in Adobe Premiere Pro to change the overall look of the clips. This made the tramp look more depressed and the abandoned girl feel more isolated from her group.
The black and white effect used in the music video represents the miserable and desolate attitudes of being lonely. We also used colour to shots to represent happiness and even though it was short cuts of colours, this showed that the homeless man gained a sense of joy when drinking alcohol. When the beggar is given money from the little girl, the scene flickers some colour to show that even though he is getting money, it will not solve all his problems.
Adobe Premiere also gives the user an opportunity to 'blur or sharpen' parts of your video. As the majority of our video was shot in a focused and clear way, we added the blur effect to distort some of the clips to represent confusion which many of the characters felt. Please see the list below of occasions where the 'Blur' effect was used:
- In the beginning of the music video, we can see the girlfriend shouting at the boyfriend. The blurred tool was used to show that her mind is confused and blurred. Please see below a still image of the video showing the blurred shot:
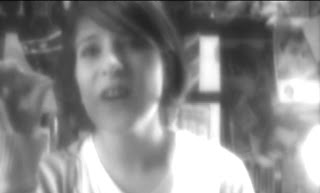
We wanted to then represent the boyfriend as more clear minded as he is arguing and defending himself. This is similar to real life as it is always argued that the boy is always right and the girl is always wrong. We wanted to represent this analogy in our music video. However, as the argument progresses, the girlfriends face becomes less blurred as it is supposed to show that she is becoming more clear minded and composes herself enough to slap the boyfriend. Please see the image below which shows the boyfriends face:

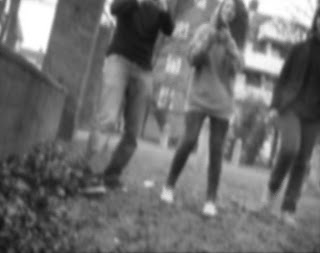
The next shot we blurred was when we showed the point of view of the tramp being harrased by the teenagers who are laughing and taking photographs of him. This shot was blurred to mirror the confused and delirious mind of the beggar; since he probably does not eat much and had been drinking some alcohol, we wanted to show his troubled state and how vulnerable he is. Please see the blurred still image from the video below:
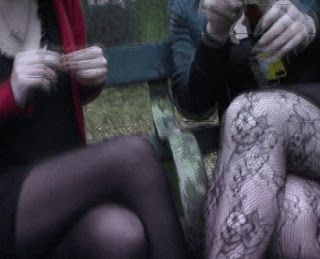
The next shot we then blurred was the scene where the camera pans up from the floor showing the bodies of the two girls. This was supposed to show their mysteriousness and the sexual orientation of these new characters. A blur effect was added to hide their real image as we wanted our audience to use their imagination to define these girls. As the viewer later sees, they are also drinking alcohol. The blurred effect represents the distorted and confused sensation and sight that the two girls may be experiencing after drinking the cider. The image below shows the two girls legs:

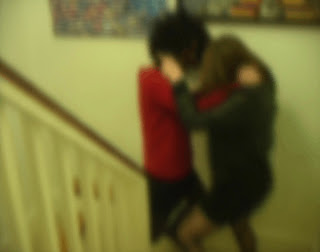
Another increased blur is used as the two girls fight on the staircase this is done to emphasise their minds as they are blurred from the alcohol and their emotions and the anger they both have due to the amount of alcohol they have consumed. Please see the still image from the video below:
Another effect can be chosen called the 'Ghosting effect'. It is used in our music video when the boyfriend is being slapped by the girlfriend early on in the music video. According to Adobe the ghosting effect 'Overlays transparencies of the immediately preceding frames on the current frame.' My view on this tool is that it duplicates the clip and then adds blur and distortion to it so both clips are overlayed and gives the appearance that there is some sort of 'ghost' like feature. This effect was not used that much as it adds a sense of falseness which we didn't want our audience who were viewing our music video to think. We only used to to emphasise the anger that the girlfriend had when slapping the boyfriend. The still image below shows the girlfriend (Jess) slapping the boyfriend (Joseph).

Aswell as blurring the shot of the two girls, we also used the 'Ghosting effect' on the shot. We used this effect to represent their hazey minds as they are opening and drinking the alcohol. The ghosting effect creates the sense that they cannot control themselves and they are vulnerable. Please see the screenshot from the music video below:
We edit the Contrast of numerous shots throughout the music video. This was done by locating the 'Effects tab' and selecting the 'Image Control' option. Here we were able to change the Brightness, Contrast Hue and Saturation. Please see a screenshot of the 'Image Control' window below:

The contrast was increased with the homeless man to emphasise and show the user the current state he was in. There was a striking difference between the dark clothes he was wearing and the brightness outside which shadowed his depression and loneliness.
Slow motion was another technique that was used during the editing process of the music video. When the frame or clip speed/duration is slowed down it emphasises the movements being created and this is then reflected by either showing the characters facial emotions or the physical movements that they are acting out.This allows the audience to see the full effect of the scene without it being rushed.
The normal speed of a clip in the frame is set at '100% speed' however when we would want to slow down the clip, we would lower the percentage.This was achieved by by right-clicking on the frame in the timeline and selecting the 'Speed/Duration' tab. The screenshot below shows the clip at 100% speed (normal speed), if the user would want to slow the speed down and extend the duration, they would change the speed to 50%.
An example of this effect being used when when Jess (the girlfriend) looks away from the camera as the boyfriend leaves the room. We extended the duration of the shot by slowing the clip down. We can see that she has lost all her anger and is now feeling very upset, we hoped that the audience would sympathize with her with this shot.

Aswell as reducing the speed of a clip we can also increase the sped and lower the duration. This is achieved again by selecting the 'Speed/Duration' tab, but instead of reducing the percentage speed, the user increases it. As said before, the original clip is set at 100% speed but we want to increase the speed to make it faster so we have to insert any percentage over 100% To double the speed and make two times as fast, 200% is selected.
Again, by using the 'Speed/Duration' tab, the user can also reverse the clip. This can be seen when the boyfriend is walking on the pathroad and whilst intime with the the music, he goes backwards and forwards. This was to show his decision in leaving - should I just leave it or should I apologise? We can see that he decides to leave the argument as the next shot we see of him is him walking towards the tramp. The image below is a still shot from this part of the music video.

Titles:
Adobe Premiere pro gave us the option to add text to our clips. We were told that in order to make it a music video, we had to include the artists name and track title in the beginning of the music video. We achieved this by going onto the insert --> text page and created the text aswell as formating it. We used a black background and made the text white for it to stand out more.